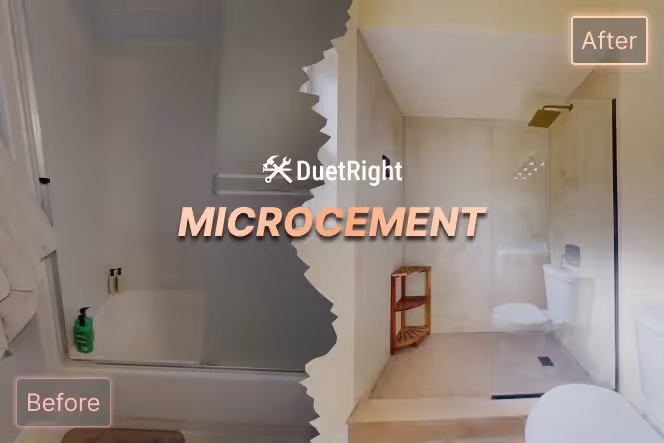
A Magical Microcement Tub-to-Shower Conversion in West Seattle
How a West Seattle property manager turned a failing tub reglaze into a microcement bathroom worth showing off.

Some rentals get a refresh. Others get a reimagining.
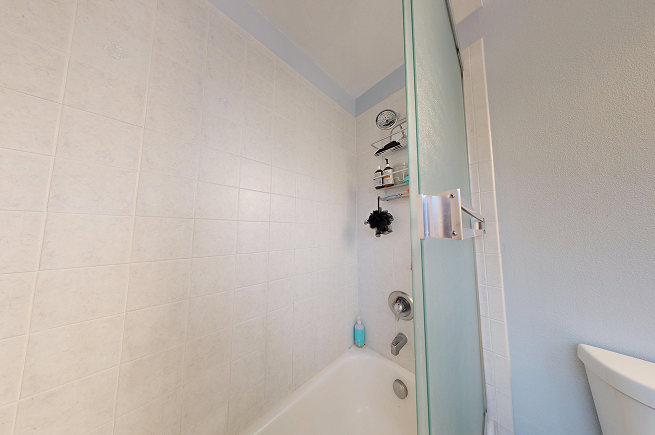
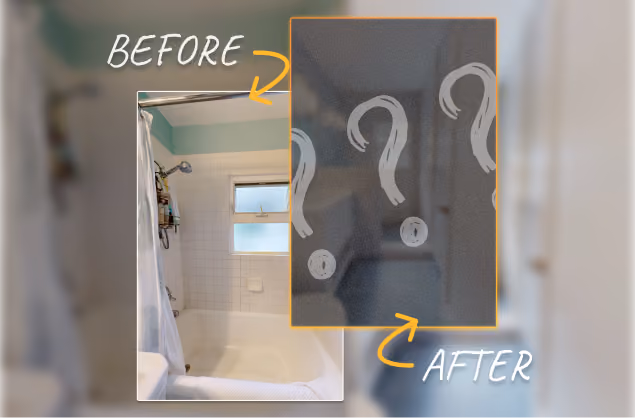
When Cody reached out about a bathroom at his West Seattle property, the situation was familiar: an old tub-shower combo that had been reglazed to buy some time.
It's a common move that works for a while, but reglaze jobs don't last forever.
And when the coating starts to fail, you're not meeting the tenant's expectations of a well-maintained unit — and in a competitive Seattle rental market, a bathroom that looks tired is a unit that sits longer.
Cody wasn't looking for another short-term fix.
He wanted to do this right, once, and come out the other side with a bathroom that looked intentional, held up to turnover, and gave the property a genuine edge.
Something that would actually stand out to a prospective tenant.
That's where this project began.
PROJECT SCOPE: 3 weeks, West Seattle, tub-to-shower conversion + full microcement finish + vanity refresh
What We Were Working With
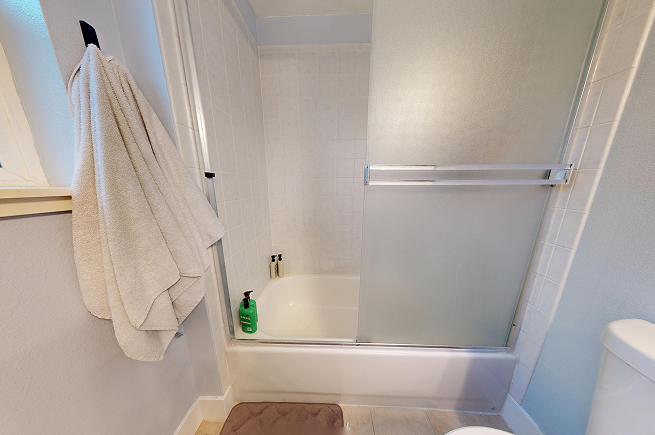
To be honest, the bathroom wasn't in terrible shape.
But the tub-shower combo dominated the room, eating up space without giving much back. Every material felt like it was from a different era. The whole room just felt outdated.
And then there was the daily reality of actually using it.
Stepping over the tub wall to get in, ducking slightly if you're on the taller side. The sliding door track was impossible to keep clean. Same with the grout lines.
Every surface had a crevice that needed upkeep.
It was the kind of bathroom that felt like work to maintain, not a place to unwind.
For a tenant, that can be frustrating. And a rental that feels dated and hard to maintain is a rental that's harder to keep filled.
The failing reglaze was what made it clear to Cody that now was the time to act.
You can work around dated fixtures. You can live with mismatched finishes. But a peeling reglaze in a rental bathroom isn't something you patch again. It's a sign that the approach itself needs to change.
Cody had been down that road.
He knew what another band-aid would get him: another few years, another failure, another call to sort it out.
What the space actually needed was a fresh foundation, a clear design direction, and materials built to last.
So that's what we set out to build.
How We Approached This Tub-To-Shower Conversion
Every tub-to-shower conversion we do follows the same philosophy: get the foundation right first, then build something worth showing off.
For Cody's West Seattle bathroom, that meant three distinct phases.
Phase 1: Demo and Foundation
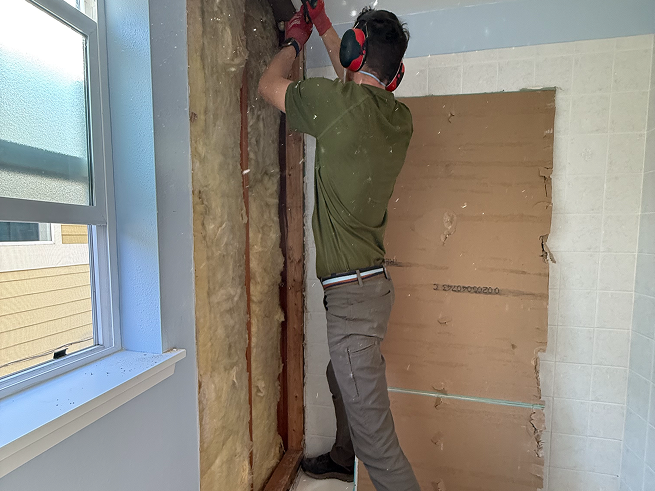
We started with a targeted demolition, pulling out the tub, the surround, and the failing reglaze entirely.
No salvaging, no working around it.
The goal was a clean substrate we could actually build on.
From there, our team constructed a custom mortar-bed shower pan with a PVC liner, sloped precisely to drain and waterproofed throughout the entire zone.
This is the part of a shower conversion that nobody photographs and everybody skips over, but it's the part that determines whether the project holds up for two years or twenty.
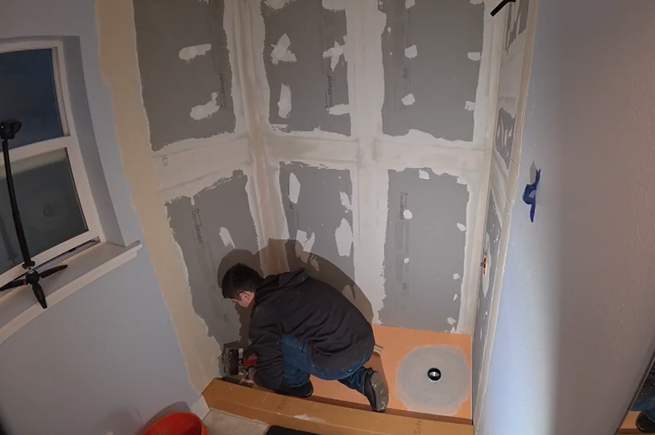
Before a single coat of microcement went on, we ran a full 24-hour flood test to confirm the pan and liner were completely sound.
Only once that passed did we move forward.
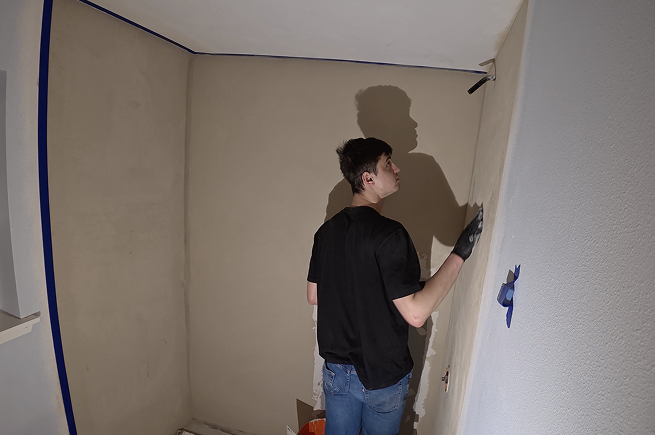
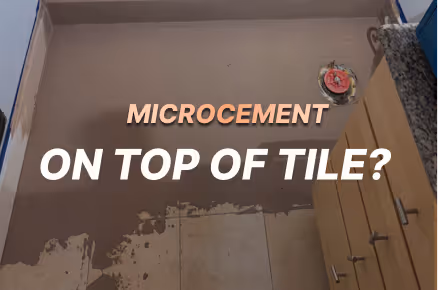
Phase 2: The Microcement Sequence
This is where the space started to become something else entirely.
We applied two coats of microcement to the shower walls, working carefully across every surface to build an even, continuous finish.
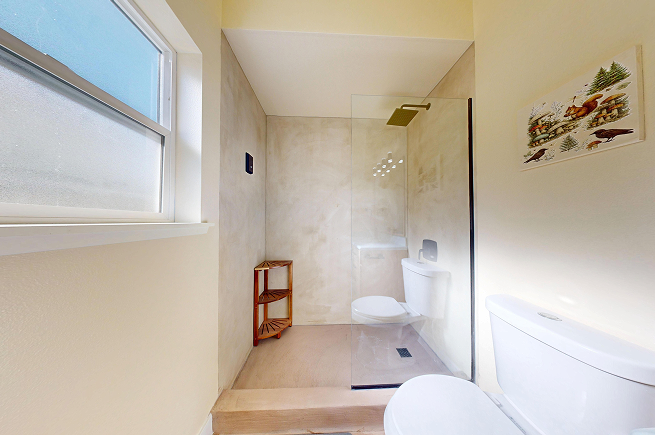
Then we carried the same material across the shower pan and out onto the main bathroom floor, which is what gives the finished space that cohesive, unbroken quality.
No threshold, no transition strip, no visual interruption.
The eye just moves through the room.
A matte polyurethane topcoat sealed everything once the microcement cured.
That protective layer is what makes this finish genuinely viable for a rental: resistant to moisture, easy to wipe down, and with none of the grout lines or crevices that made the old setup such a maintenance headache.
Quick aside: if you want to understand why microcement works so well in wet environments, our microcement bathroom page goes deeper on the waterproofing system underneath.
Then came the shower plumbing and valve trim, installed and tested to make sure everything functioned exactly as it should. The frameless glass panel went in last, with all alignment and seals carefully verified before we moved on.
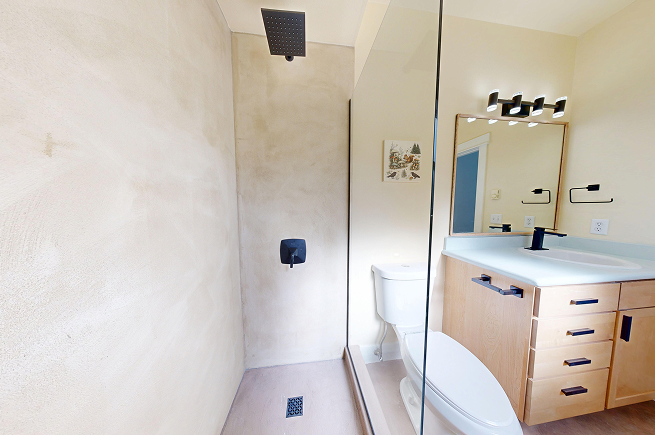
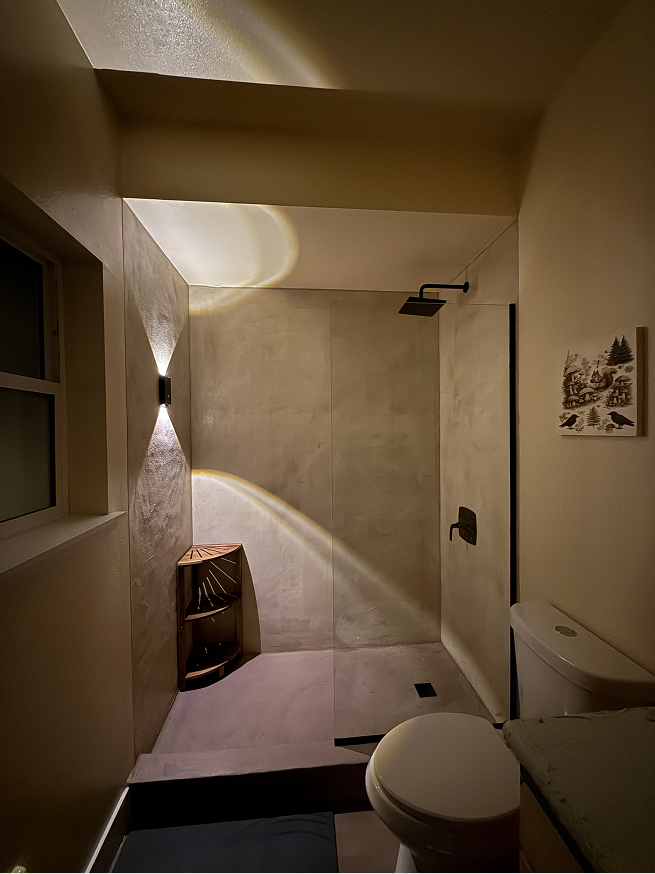
The result of Phase 2: a shower that felt open, calm, and complete.
No door to duck under. No track to scrub. Just a clean glass panel and a rain showerhead.
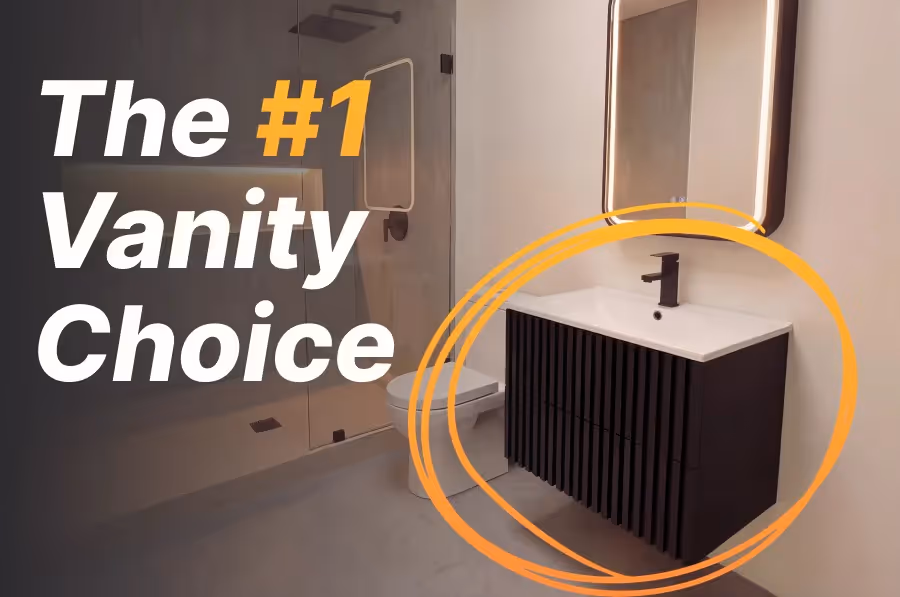
Phase 3: The Vanity Refresh
A new shower in an old bathroom is a half-finished story. The vanity area needed to catch up.
We applied a matching microcement finish over the existing countertop, coordinated to the same tone as the shower, so the whole room read as one considered design rather than a renovation dropped into an unchanged space.
The old faucet came out and was replaced with a clean, low-profile matte black unit. New drawer pulls went on the cabinet faces. A new black vanity light fixture replaced the old one overhead.
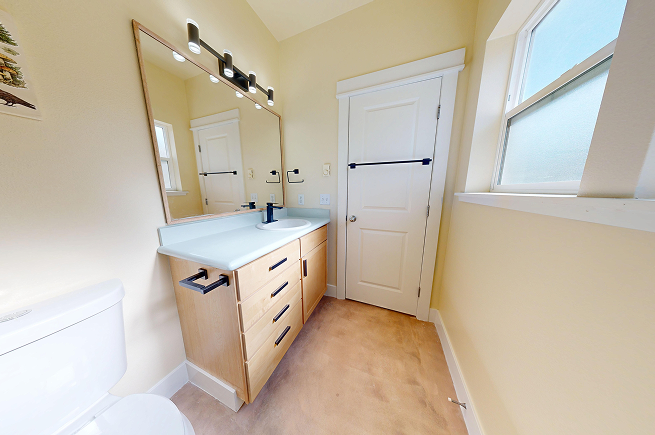
The last piece was a custom oak mirror frame, built and installed around the existing mirror.
It's a small detail that carries a lot of weight. That warm wood tone against the creamy walls and matte black hardware is what pulls the whole room together and gives it a finish that feels deliberate rather than assembled.
We closed out with fresh paint on the bathroom walls, final trim work, toilet installation, and a full silicone seal throughout.
Then a thorough quality check, a clean sweep, and final inspection.
Why This Style Wins for Rentals
A tub-to-shower conversion is already a smart move for a rental. But the finish you choose determines how long that investment actually holds up.
Microcement earns its place here because it eliminates the maintenance problems that make tub-shower combos such a headache in the first place.
No grout lines to scrub, no caulk seams to re-do every couple of years, no surfaces that look worn after a few tenants cycle through.
The polyurethane topcoat handles moisture, daily cleaning, and the general wear of rental life without needing to be replaced. When resealing is eventually needed, it's a straightforward service — not a renovation.
The seamless floor-to-shower continuity isn't just an aesthetic choice either.
Carrying the microcement from the shower walls across the pan and out onto the bathroom floor removes every transition, every threshold, every potential weak point where water can work its way in over time.
It's a cleaner look and a more durable system.
And durability aside, there's the simple reality of what a bathroom like this does for a listing.
In a competitive Seattle rental market, most units are offering the same thing.
A walk-in shower with a rain head, warm microcement walls, matte black hardware, and a custom oak mirror frame is not the same thing. It's the kind of finish that photographs well, shows well, and stays in a prospective tenant's mind after they've toured three other places that afternoon.
Cody wanted a bathroom that worked harder for his property. This one will.
Ready for a Bathroom That Works for Your Property?
This project is a good example of what happens when a property owner stops maintaining a problem and starts solving it.
The tub is gone. The band-aid fixes are gone. What's left is a bathroom that's easier to clean, easier to rent, and built to stay that way.
If you manage a rental property in Seattle and you've been staring at a bathroom that's overdue for a real upgrade, we'd love to talk through what's possible.
And if you're a homeowner who's been thinking about ditching the tub for a proper walk-in shower, this project might give you a sense of what that could look like.
You can learn more about our microcement work at our microcement bathroom page, or take a look at how we approached a similar project in Kirkland if you want another point of reference.
If you're earlier in the planning process and want to understand what a bathroom renovation typically costs in Seattle, we've got you covered.
Whenever you're ready to upgrade your space, just get in touch.
Explore Recent Posts
Working With a Client to Reimagine Their Capitol Hill Bathroom In 4 Weeks
Can You Put Microcement Over Tile?