Working With a Client to Reimagine Their Capitol Hill Bathroom In 4 Weeks
A century-old bathroom rebuilt the way its owner imagined it, down to the last tile.

🎨 Style: Bright, spa-modern. Large-format tile, open glass, chrome throughout
⏱ Timeline: 4 weeks, demolition to completion
💰 Investment: $20,843
🔨Scope: Full demolition, tub-to-walk-in-shower conversion, new tile floor and walls, all-new fixtures, window replacement, and paint
Cara loves her 1928 Capitol Hill condo. Her bathroom was another story.
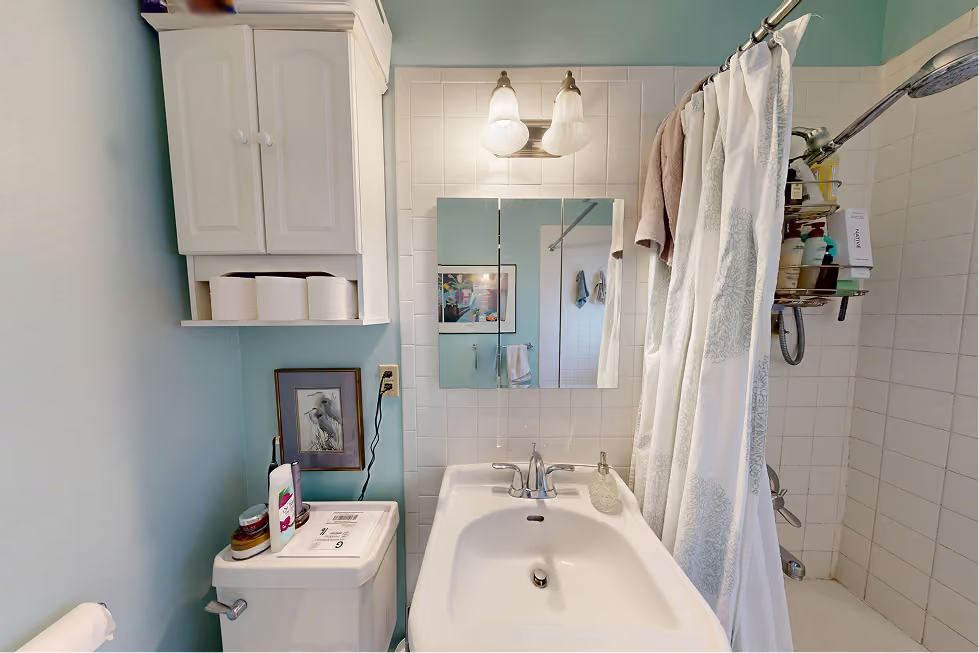
The tile was original, the storage was nonexistent, and the cast-iron tub she stepped over every morning was becoming a nuisance.
What she wanted was simple: a bathroom she could use safely and easily for decades to come, in a space that still felt like her home.
After ironing out the project details, Cara gave us the building access code, flew to Europe, and we got to work.
Over the next four weeks, with progress updates landing in her inbox, Cara watched the bathroom she had designed come to life from abroad.
But to appreciate how far this bathroom came, you have to see where it started.
The Before State of the Bathroom
Cara came to us the way most of our favorite projects start: a friend of a past client passed along our name.
Her first question was actually about her kitchen. But when Stan walked the condo for the initial assessment, the conversation kept returning to the bathroom.
And there was plenty to talk about.
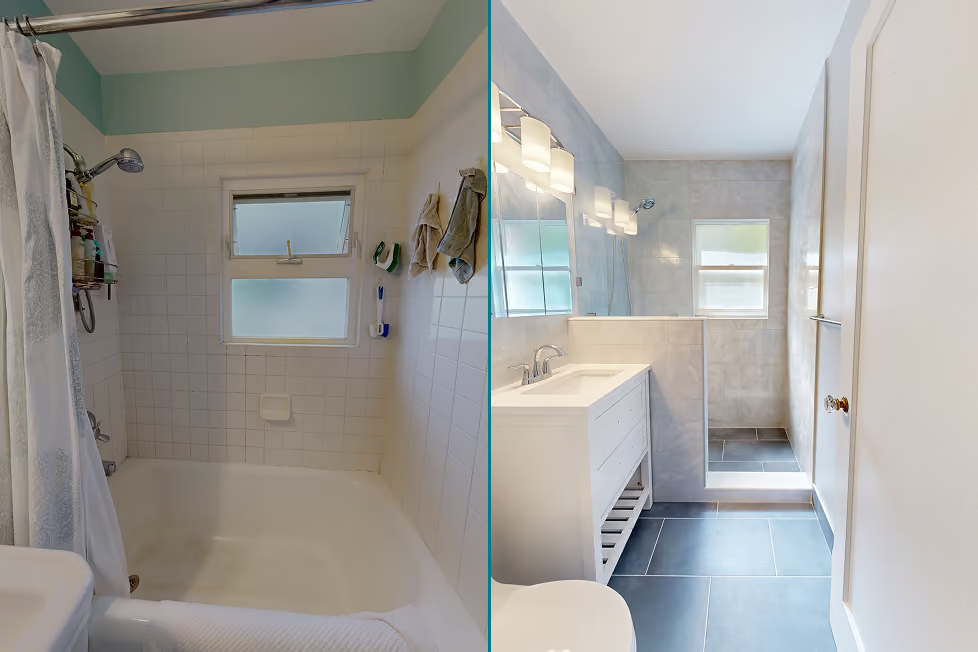
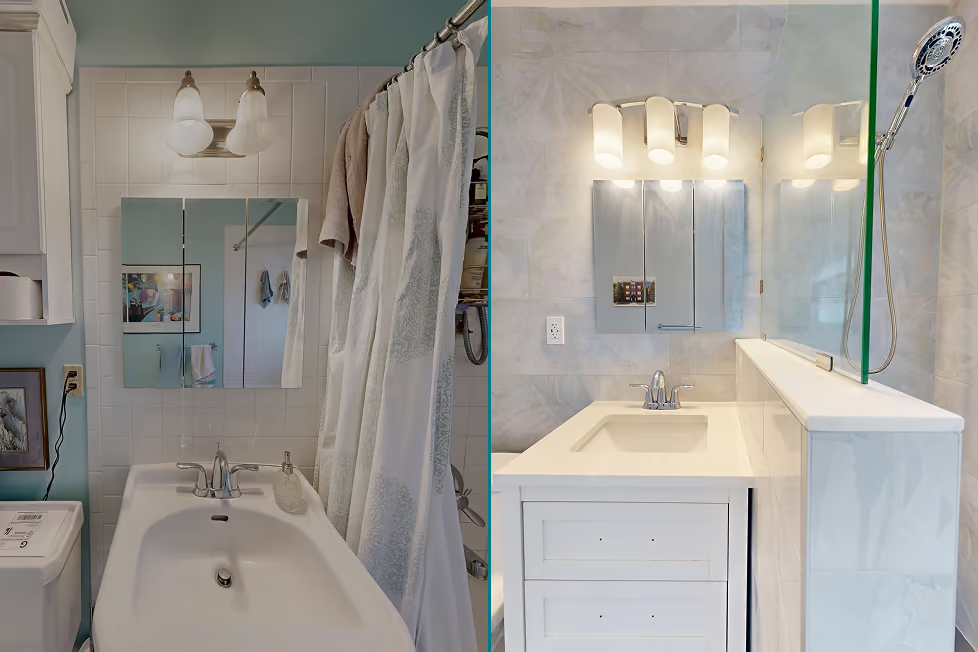
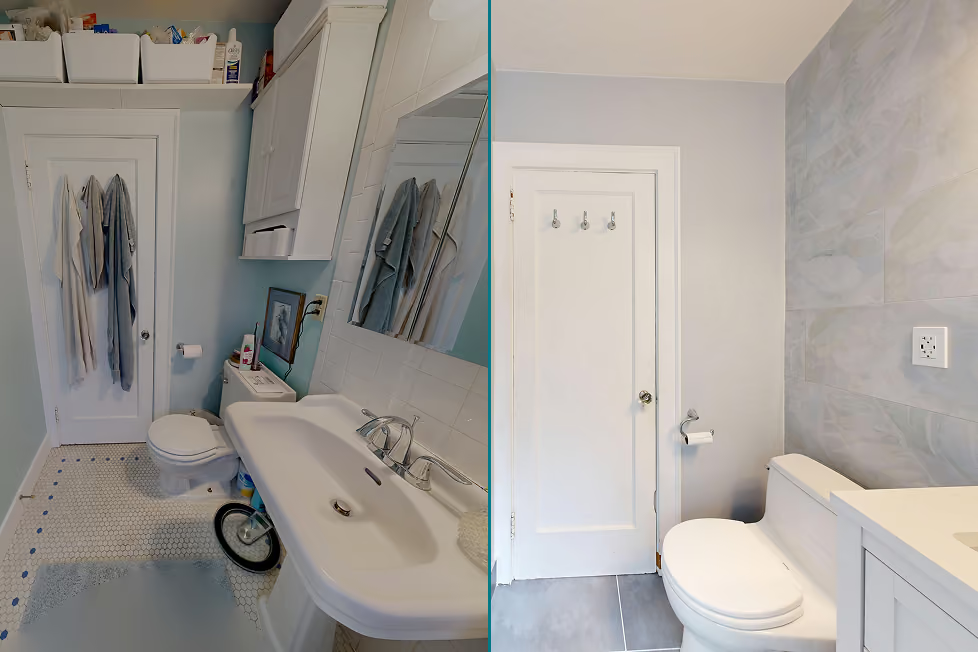
The tile was original to the building, and decades of Seattle moisture had darkened the grout lines. The pedestal sink had no storage, so everything ended up crammed in a cabinet above the toilet. And the toilet sat so close to the door that it barely cleared it every time it closed.
And at the center of it all sat a deep cast-iron tub with a wall to step over at the beginning and end of every shower.
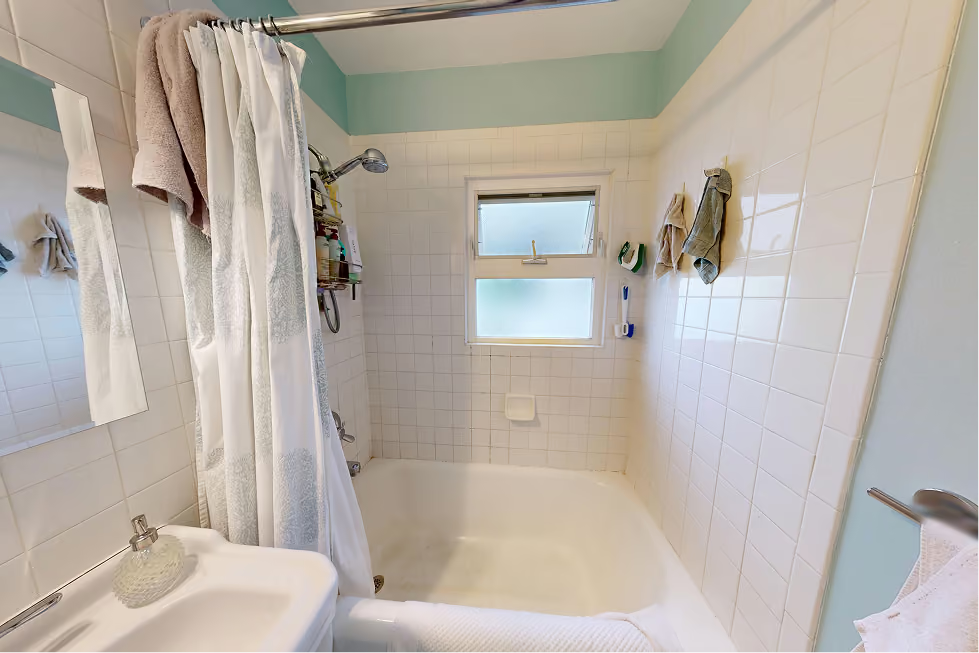
Cara was weighing whether to keep the tub or convert to a walk-in shower, and her priority was clear from the start: ease of use, and a bathroom she could get in and out of comfortably as she gets older.
When she later chose her floor tile, she picked a non-slip surface and made sure nothing we did would compromise it. She was designing for the next twenty years, not the next open house.
Naturally, life put the project on pause after that first assessment, but almost a year later, Cara called us back.
She'd made her decision: the tub was out, and the walk-in shower was in. What happened next is where this project gets interesting.
What Went Into This Project
From day one, this renovation ran on a simple arrangement: Cara made the design calls, and we made them real.
She chose every visible finish in the room: the wall tile, the floor tile, the grout color, the vanity, the faucet, the light fixture, and the accessories, right down to her rule that the shower niche and pony wall cap would not be white.
When she wanted options, we sent them. We texted her faucet choices with links, researched toilets that would actually clear her door, and built 3D renders so she could see the finished bathroom before a single tile was ordered.
Then there was the logistics puzzle: Cara lives in a condo with no garage, and she'd be in Europe for the entire build. So every order she placed shipped to our shop instead. We received it, labeled it, inventoried it, and stored it free of charge until demo day.
By the time we started, her entire bathroom was staged and waiting: tile from Floor & Decor, a TOTO toilet from Lowe's, a custom-cut glass panel, and chrome pulls from Amazon.
Her vision was boxed up and ready. Our job was simply to bring it to life.
Demo Day Brings a Surprise
Demolition started in early May. By the end of day one, we'd found what old buildings love to hide.
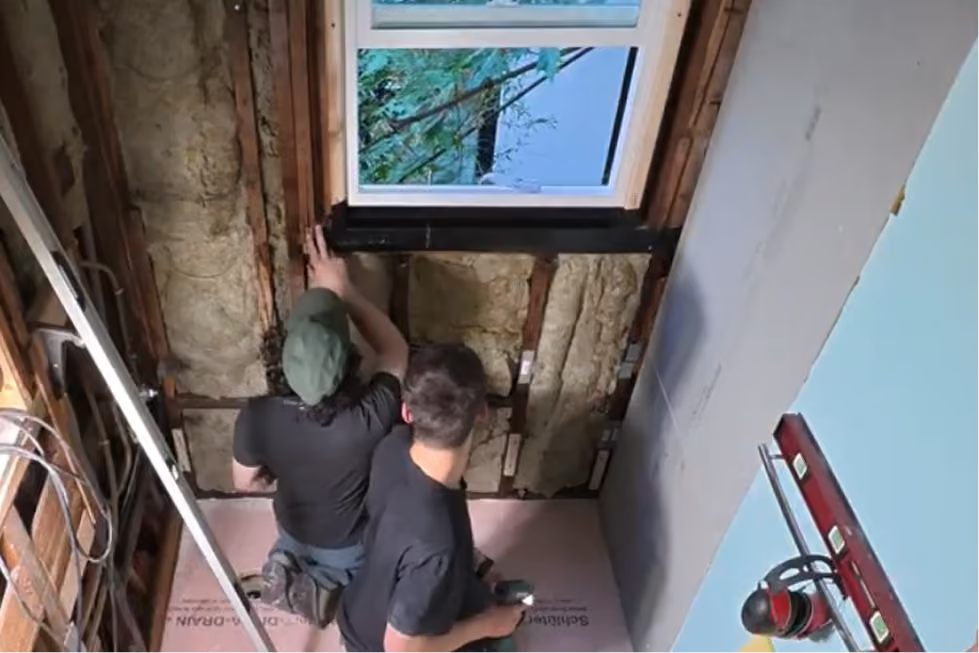
Behind the tub surround, the window framing was completely rotted. Decades of shower spray hitting a window inside the wet zone had let moisture into the wall of this 1928 building, and mold had moved in with it.
This is the moment that tests a renovation, especially with the homeowner nine hours ahead of Seattle time.
We documented everything, emailed Cara that evening, and gave her a clear picture: what we found, what it would take to fix, and what it would cost. She approved the plan and ordered the new window herself.
We contained the mold and treated the affected framing with an antimicrobial solution. We re-framed the rough opening completely, with a new header, new studs, and a new sill. We installed a bathroom-grade Jeld-Wen window that Cara supplied and sealed it with sill pan flashing so water can never pool inside that wall again. Outside, we re-parged and tuckpointed the brick around the opening, working from the second floor. Finally, a frosted privacy film finished it off.
Getting the Bones Right
With the walls open, we rebuilt everything you'll never see, because that's what decides whether a bathroom lasts.
The original drain wasn't pitched properly, so water had never drained the way it should. We relocated and re-sloped it. We reinforced the framing, insulated the exterior wall and under the floor, and built the new shower system with a full waterproofing envelope: membrane on every surface, every seam taped and sealed.
Then we filled the pan and let it sit for 24 hours. A flood test is the kind of behind-the-scenes step you don't always think about, but it's the difference between knowing a shower is watertight and hoping it is. Ours held.
The Tile Goes Up
This is the part that never gets old, when the room Cara picked out on a screen starts appearing on the walls.
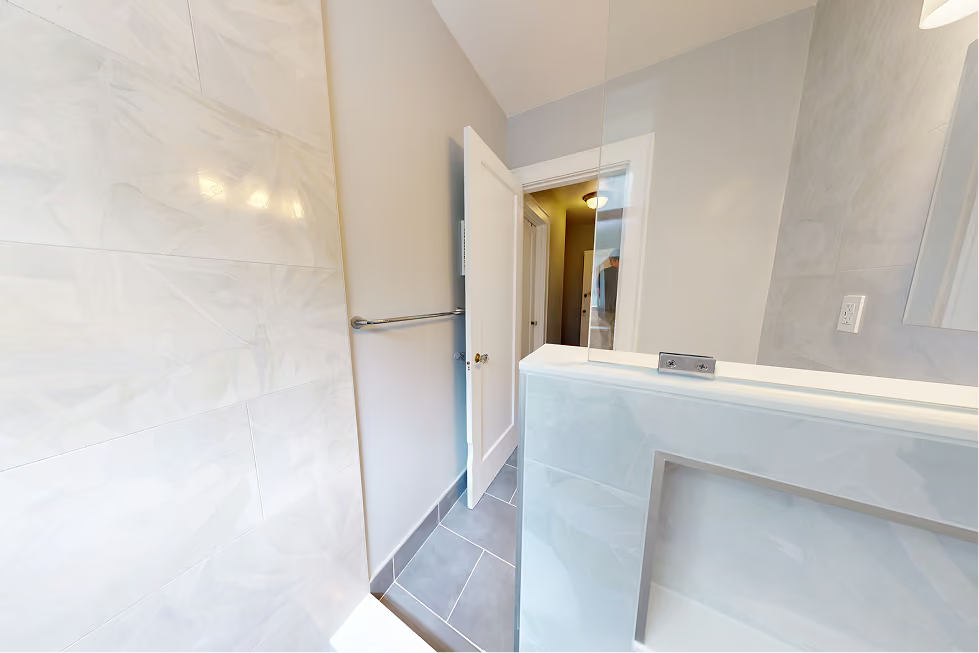
Her wall tile, a soft marble-look 12"x36" ceramic, went up horizontally with a one-third offset and minimal grout lines, a layout we'd talked through with her by phone for the cleanest look and best slip resistance. Her floor tile, a matte slate-blue porcelain, was laid so the planks lead your eye straight toward the shower entry. The niche was tiled to match the walls so it recedes instead of shouting. Even the pony wall cap got the wall tile treatment, exactly as she'd spec'd it: not white.
One more thing worth mentioning. Midway through the build, Memorial Day weekend arrived, and the neighbors below hoped for a quiet holiday at home. So we put the power tools down and kept the weekend work silent. Good renovations respect the whole building, not just the unit we're working in.
By June 5, less than four weeks after demo, the bathroom was done.
What Cara's Bathroom Is Like Now
Cara flew home from Europe to a bathroom she had never stood in but had shaped in every detail.
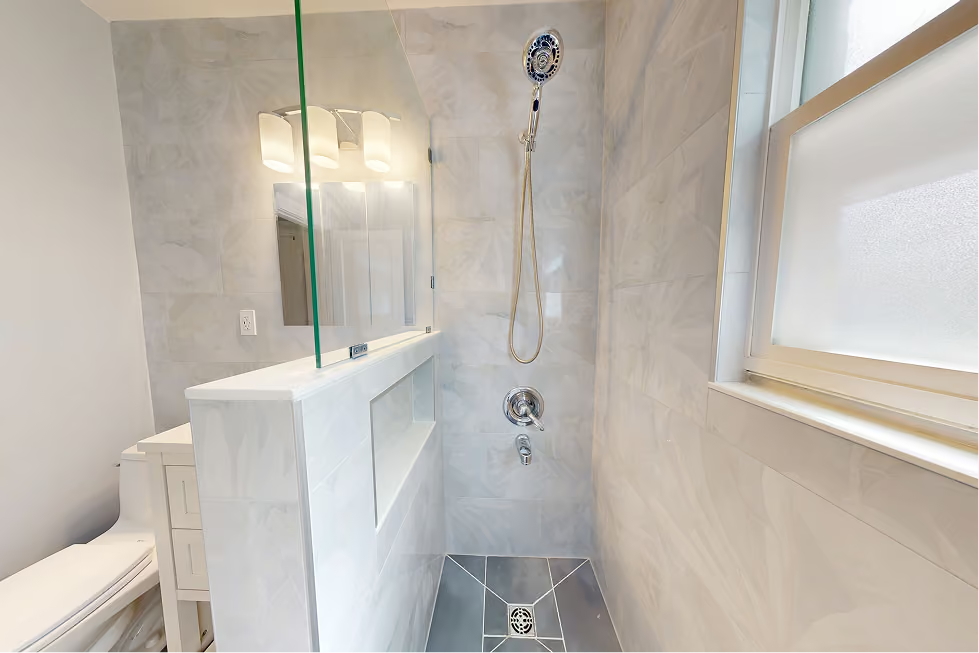
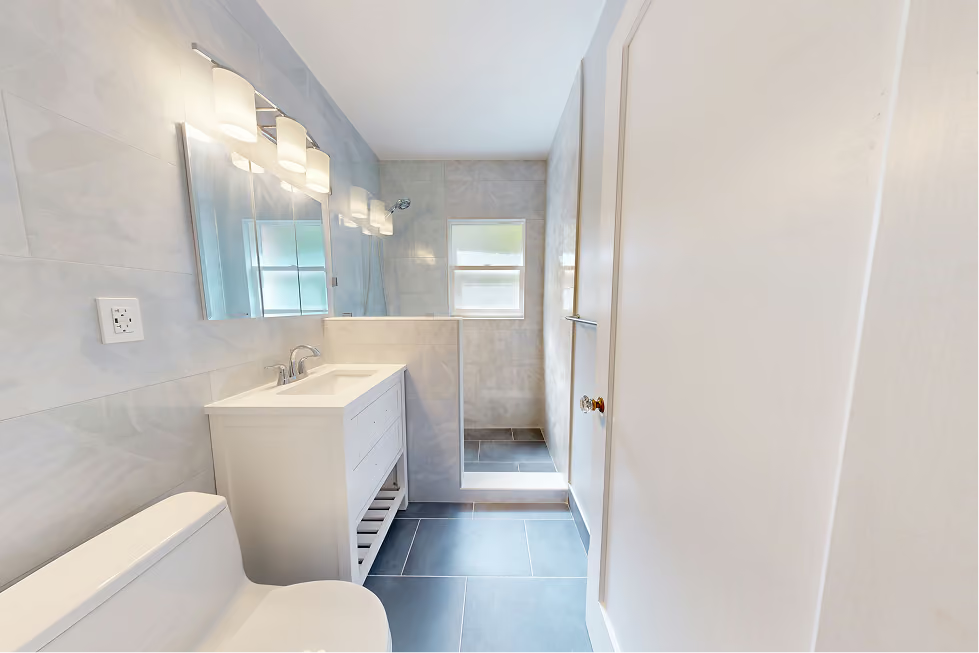
The tub and its wall are gone. In their place is an open walk-in shower with a low, easy entry, a half wall capped in her tile, and a single pane of frameless glass that lets light travel the full length of the room. The marble-look tile she chose runs floor to ceiling, and the slate-blue floor she insisted stay non-slip leads you right to the shower entry. Chrome carries through every fixture she picked, from the faucet to the light above the mirror, which we hung low enough that she can reach the bulbs without a step stool.
The practical wins stack up quickly. She has drawers for the first time in this bathroom's hundred-year life, plus a recessed medicine cabinet and a niche in the shower that keeps bottles off the floor. The large-format tile and minimal grout lines mean cleaning takes a fraction of the effort the old tile demanded. The toilet no longer fights the door. And every morning starts with a walk into the shower instead of a climb.
There was an unexpected benefit, too. Because demolition uncovered that hidden window damage, the wall behind her shower is now drier, better insulated, and more structurally sound than it has been in decades.
Cara didn't just get a new bathroom. She got a healthier building envelope in the one room that needed it most.
In her words, the finished space "truly reflected our style." That was the whole point. Every material in this room was her call, and our crew's job was to honor those calls with clean, careful work.
An upgrade like this is also a sound investment. This project came in at $20,843, below the Seattle midrange bathroom remodel average of $26,138, in the remodel category that returns roughly 80 percent of its cost at resale.
Steal This Style For Your Project
Want to bring some of Cara's choices into your own bathroom? Here is what did the heavy lifting in this design, and why each one works.
The tile that makes a small room feel bigger. Cara chose Oasis Blume, a 12"x36" ceramic with soft marble-look veining, and we ran it horizontally with a one-third offset and minimal grout lines. Large-format tile means fewer grout lines, and fewer grout lines mean the eye reads the wall as one calm surface instead of a grid.
The floor that guides you. Her floor is Pier Blue, a 12"x24" matte porcelain in a slate-blue gray with a non-slip surface. We laid the planks so they run toward the shower entry, which quietly pulls the whole room in that direction. A warm gray grout ties the floor to the walls without competing with either.
The chrome thread. Every metal in this room matches. The Delta Lahara faucet, the Crosby three-light fixture, the Amerock pulls on the vanity, and the Moen Glyde towel bar and hooks all share the same polished chrome finish. Committing to one finish is the simplest design decision that makes a bathroom look intentional.
The disappearing niche. The shower niche is tiled in the same Oasis Blume as the walls, so it reads as a shadow in the wall rather than a shelf bolted onto it. Cara was specific that it not be white, and she was right.
The quiet workhorse. The TOTO Eco UltraMax is a one-piece toilet with a round bowl, chosen because its compact depth clears the bathroom door with room to spare. The best fixture choices solve a problem you never have to think about again.
In Cara's Words
"We appreciated being given the freedom to select our own design materials, allowing us to create a space that truly reflected our style, while benefiting from their guidance and expertise throughout the process. Renovations often uncover surprises, and when an unexpected issue arose with the need to replace the bathroom window in our 1928 condo, the team thoughtfully approached the challenge with patience, expertise, and flexibility. What stood out most was their genuine desire to bring our vision to life—not just complete a project, but create a finished space that felt like ours. Highly recommended! This is an incredible team! Mike, Angelo, Stan, Victor. Bravo!"
View her 5-star Google review and others here.
Ready to Start Your Own Project?
Cara's project is proof of a simple idea: the best renovations don't start with a design trend. They start with a homeowner who knows how she wants to live, and a crew that listens closely enough to build exactly that.
If your own bathroom has started working against you, or you've been putting off a renovation or remodel because life keeps you too busy to manage one, we'd love to chat.
We'll answer your questions, share ideas, and help you imagine what your space could become. Whenever you're ready, we're here.
Explore Recent Posts
Can You Put Microcement Over Tile?
Why We Almost Always Recommend a Floating Vanity (And What They Actually Cost)