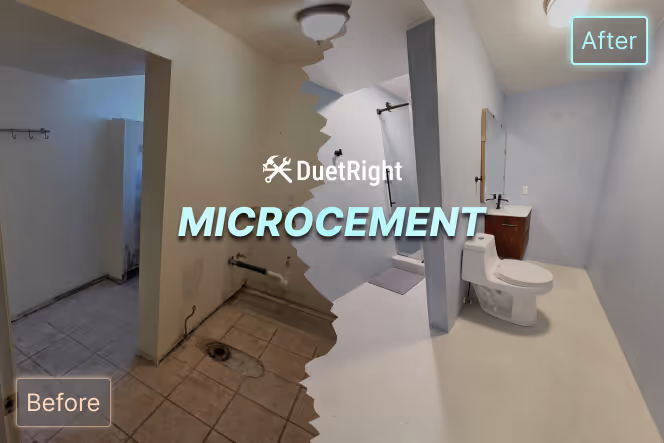
Can You Put Microcement Over Tile?
Here's when it works, when to retile instead, how it's installed, and what it costs.

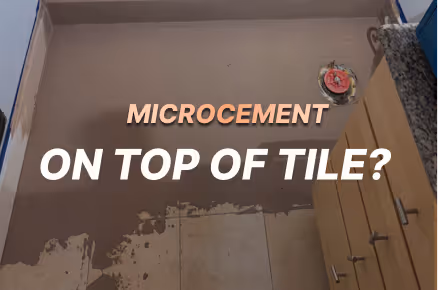
Can you put microcement over tile?
Yes, you can put microcement over tile. As long as the existing tile is sound and firmly bonded to the surface beneath it, a properly installed microcement system covers it completely, with no demolition and no grout lines left behind.
But that one word, “sound,” is carrying the whole sentence. Microcement is a thin coating and it takes on the behavior of whatever sits underneath it. Apply it over loose, hollow, or cracked tile and you inherit every one of those problems in a finish that’s harder to fix than the tile was.
So the honest answer isn’t a flat yes. It’s yes, when the surface earns it, and this guide walks through exactly when it does.
We’re a remodeling company based in Seattle, and microcement over existing surfaces is a large part of what we do. The points below come from the jobs themselves, not a product brochure.
Why Homeowners Want to Go Over Tile in the First Place
The appeal is easy to understand the moment you’ve priced a tile tear-out.
Removing tile is slow, loud, and messy. Crews chip it off by hand, the dust gets into everything, and you often discover problems in the wall or floor once the old surface is gone. Microcement skips that entire stage. The coating bonds to the tile you already have, which means no demolition waste, no days of jackhammering, and no surprise repairs to the substrate just to get back to square one.
It’s also remarkably thin. A finished microcement surface runs about two to three millimeters, so it adds almost no height to a floor and won’t foul your doors, thresholds, or the transition into the next room. That thinness is the reason it can sit on top of tile at all.
Then there’s the finish itself. Microcement goes on as one continuous surface, so the grout lines disappear: no grid of joints to scrub, no caulk seams to redo every couple of years, and no crevices for grime to settle into.
For a lot of people, that maintenance relief matters as much as the modern look.
When Microcement Over Tile Actually Works
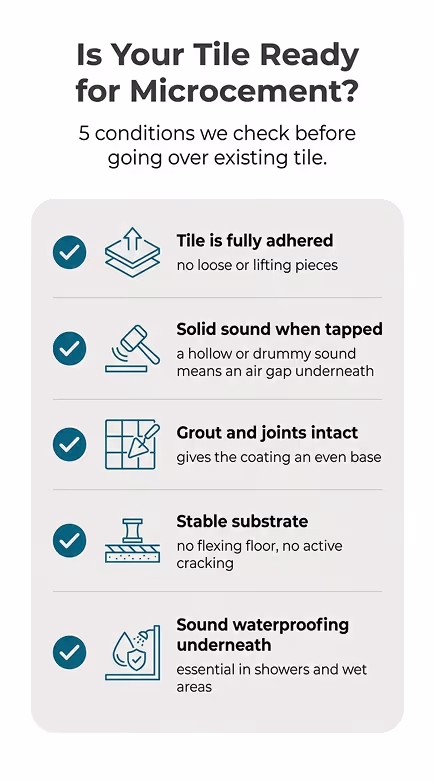
Microcement needs a stable foundation, because it moves with whatever it’s bonded to. Before we ever quote an overlay, we’re checking the existing tile against a short list of conditions.
The tile has to be fully adhered.
Tap across the surface and listen: a solid, consistent sound means the tile is bonded, while a hollow or drummy sound means there’s an air gap underneath, and any tile that’s lifting will eventually take the coating with it.
The grout and joints should be intact, because microcement is continuous and needs an even base to read smoothly. The substrate underneath has to be stable, with no flexing floor and no active cracking, since movement below telegraphs straight up through a thin finish. And in a wet area, the waterproofing beneath the tile has to be sound, a point worth its own section below.
If your tile checks those boxes, it’s an excellent candidate. A flat, well-bonded tile wall or floor is honestly one of the better surfaces microcement can go over, because the hard work of leveling is already done.
When We’d Tell You to Retile Instead
This is the part most microcement articles leave out, usually because they’re written by companies selling the material rather than installing it.
Sometimes the right answer is no.
If the tile is loose or hollow across more than a small patch, going over it just buries a problem that will resurface as cracks. If the floor flexes underfoot or the substrate is already cracking, the same movement that broke the tile will break the coating, and now it’s bonded to a surface you have to grind off to repair. And if there’s any sign of failed waterproofing behind a shower or tub, mold at the edges, soft spots, staining that keeps coming back, no surface coating fixes what’s happening behind the wall.
In those cases we’ll tell you to pull the tile and start with a sound substrate. It costs more up front. It’s also the difference between a finish that lasts two years and one that lasts twenty, and we’d rather lose the shortcut than warranty a failure.
How DuetRight Installs Microcement Over Tile
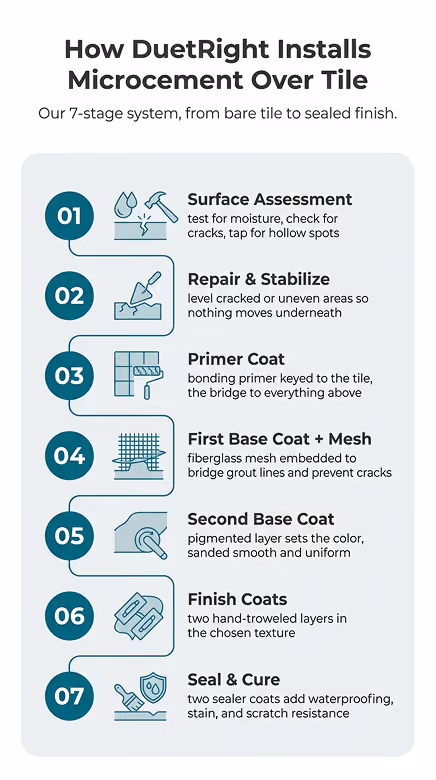
When the tile passes inspection, the result comes down entirely to the system underneath the finish. Skipping a step here is the single most common reason DIY overlays crack or peel. Our process runs in seven stages.
It starts with a surface assessment: we test for moisture, check for cracks, and confirm adhesion, tapping the tile for hollow spots and verifying the substrate isn’t moving. That read determines everything that follows. Next comes repair and stabilize, where any cracked, uneven, or compromised areas get repaired and leveled, because a moving substrate produces a cracking overlay and there’s no negotiating around it.
From there we move to the primer coat, selected for the surface type. Glazed tile is non-absorbent, so it gets a primer formulated to grip a slick surface, lightly abraded first so the bond has something to key into. The primer is the chemical bridge between the old tile and everything above it.
Then the first base coat goes on with a fiberglass reinforcement mesh embedded directly into it, which is what bridges the grout lines and tile edges so they can’t telegraph through as hairline cracks later. Once it’s dry, we sand it smooth and apply the second base coat, this one pigmented to establish the color, then sand again for a uniform surface.
The finish coats come next: two hand-troweled layers in the texture you’ve chosen, whether that’s smooth, an aggregate, or a visible trowel mark. This is the stage that gives the surface its character. Finally, seal and cure, where two coats of high-grade sealer set the sheen level and deliver the waterproofing, stain resistance, and scratch resistance that let the finish stand up to daily use.
Mesh and primer are the two steps amateurs tend to skip to save time. They’re also the two steps that decide whether the overlay survives its first year.
Showers and Wet Areas: The Waterproofing Truth
Here’s a distinction that gets blurred constantly: microcement is a finish, not a waterproofing membrane on its own.
In a shower or around a tub, the waterproofing system lives underneath everything, in the substrate and the pan, and it has to be sound before any coating goes on top. The sealer we roll on at the end adds a genuine waterproof, stain-resistant layer at the surface, but it works with the membrane below, not as a replacement for it. That’s why our wet-area jobs include a real waterproofing stage and, on a shower build, a flood test before a drop of microcement is applied.
Get that order right and microcement is excellent in wet rooms, precisely because it has no grout joints for water to find. Get it wrong and you’ve sealed a leak inside the wall. If you want the deeper version, our microcement shower and microcement bathroom pages break down the waterproofing system layer by layer.
What Microcement Over Tile Costs
Pricing depends on the space, but here’s a real number to anchor against.
DuetRight’s microcement projects average around $47 per square foot, including materials, application, and waterproofing. Substrate condition and surface complexity move that figure: a sound, simple wall sits at the low end, while a shower with detailed prep and full waterproofing sits higher. For context, high-end waterproof applications in major metro areas typically run $50 to $80 per square foot.
Compared against a full tile tear-out and rebuild, an overlay often comes out ahead, because you’re not paying for demolition, disposal, or the substrate repairs that surface once the old tile is gone. The honest caveat is that condition drives the price, which is why a real quote beats any online estimate. If you're looking for a microcement installer in the Seattle area, you can get a quote for an accurate number on your specific project.
What This Looks Like in a Real Bathroom
Two recent projects show both sides of the picture.
In West Seattle, a property manager named Cody came to us with a rental bathroom whose tub had been reglazed to buy time, and the coating was failing. Rather than patch it again, we did a full tub-to-shower conversion. The shower walls took two coats of microcement, and we carried the same material across the pan and out onto the bathroom floor so the eye moves through the room with no threshold to interrupt it.We even applied a beautiful mint green microcement directly over the existing vanity countertop.
In Kirkland, the starting point was a cramped, dated bathroom with visible mold on the shower ceiling. The homeowner wanted calm: no grout lines, no scrubbing, just a continuous surface. Most of that job was preparation, smoothing walls, filling low spots, correcting the ventilation, sanding every surface uniform, because, as our team puts it, microcement only looks as good as what’s underneath it. The hand-troweled finish that followed is what made a tight room feel open and intentional.
Can You DIY Microcement Over Tile?
You can buy the materials. Whether you should is a different question.
Microcement over tile punishes shortcuts more than almost any other finish, because the failure points are invisible until they show up as cracks or delamination months later. The mesh has to be embedded correctly, the primer has to match the surface, each coat has to cure before the next, and the waterproofing in a wet area has no margin for guesswork. An experienced applicator is controlling all of that at once, and it’s why even the manufacturers who sell DIY kits quietly recommend a professional for anything in a bathroom.
If you’re refreshing a low-stakes surface and you enjoy the learning curve, a DIY overlay can work. For a shower, a floor, or anything you’re relying on to stay watertight, the install is the product, and that’s worth hiring out.
Frequently Asked Questions
Is microcement over tile waterproof?
Once sealed, the microcement surface is waterproof and stain resistant. In a shower or wet area, though, the surface seal works together with a waterproofing membrane underneath, which has to be sound before the coating goes on. Microcement is the finish, not the membrane.
Does microcement crack over tile?
Not when it’s installed correctly over a sound, stable surface. Cracking almost always traces back to a moving substrate, loose tile, or a skipped reinforcement mesh. The fiberglass mesh embedded in the base coat is specifically there to bridge grout lines and prevent hairline cracks.
How thick is microcement, and will it raise my floor?
A finished microcement application is roughly two to three millimeters thick. It adds very little height, which is why it rarely interferes with doors or thresholds and can go straight over existing tile.
How long does microcement last?
A professionally installed, sealed microcement surface lasts for many years. The finish coat can be refreshed or resealed when it eventually wears, which is a straightforward service rather than a full renovation.
Can you apply microcement over shower tile and floor tile?
Yes to both, provided the tile is bonded and the waterproofing beneath a shower is sound. Floors and shower walls are among the most common surfaces we coat. You can see the floor system on our microcement flooring page.
Do you have to remove the grout or fill the joints first?
The joints are addressed as part of prep so the surface reads as one continuous plane. You don’t remove the tile, but the grout lines are handled before the base coats go on.
The Bottom Line
Microcement over tile is one of the best ways to modernize a bathroom, kitchen, or floor without the cost and disruption of a tear-out, but only when the tile underneath is sound and the system is installed properly. The material is forgiving to live with and unforgiving to install, which is exactly why the surface assessment matters as much as the finish.
If you’re weighing an overlay against a full remodel and want a straight answer on which one your space actually needs, we’re glad to take a look. Start with our guide to what microcement is, or tell us about your project and we’ll tell you honestly whether your tile is ready for it.
Explore Recent Posts
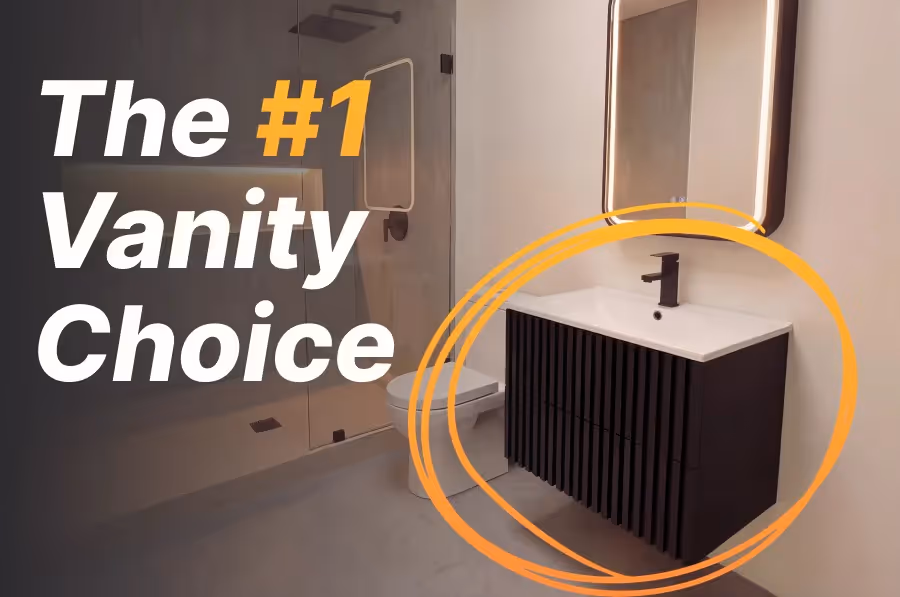
Why We Almost Always Recommend a Floating Vanity (And What They Actually Cost)
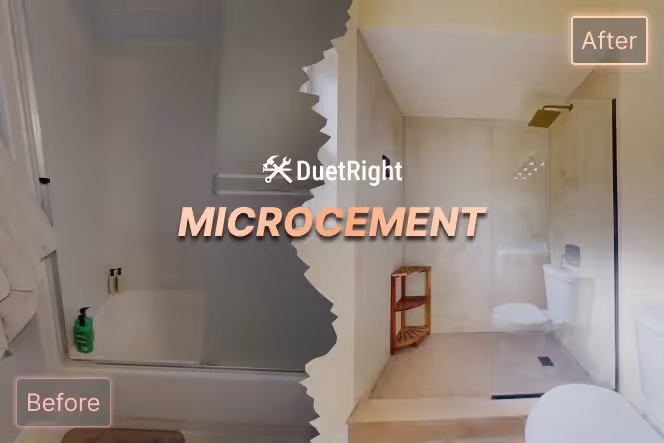
A Magical Microcement Tub-to-Shower Conversion in West Seattle